Tag:

DIY

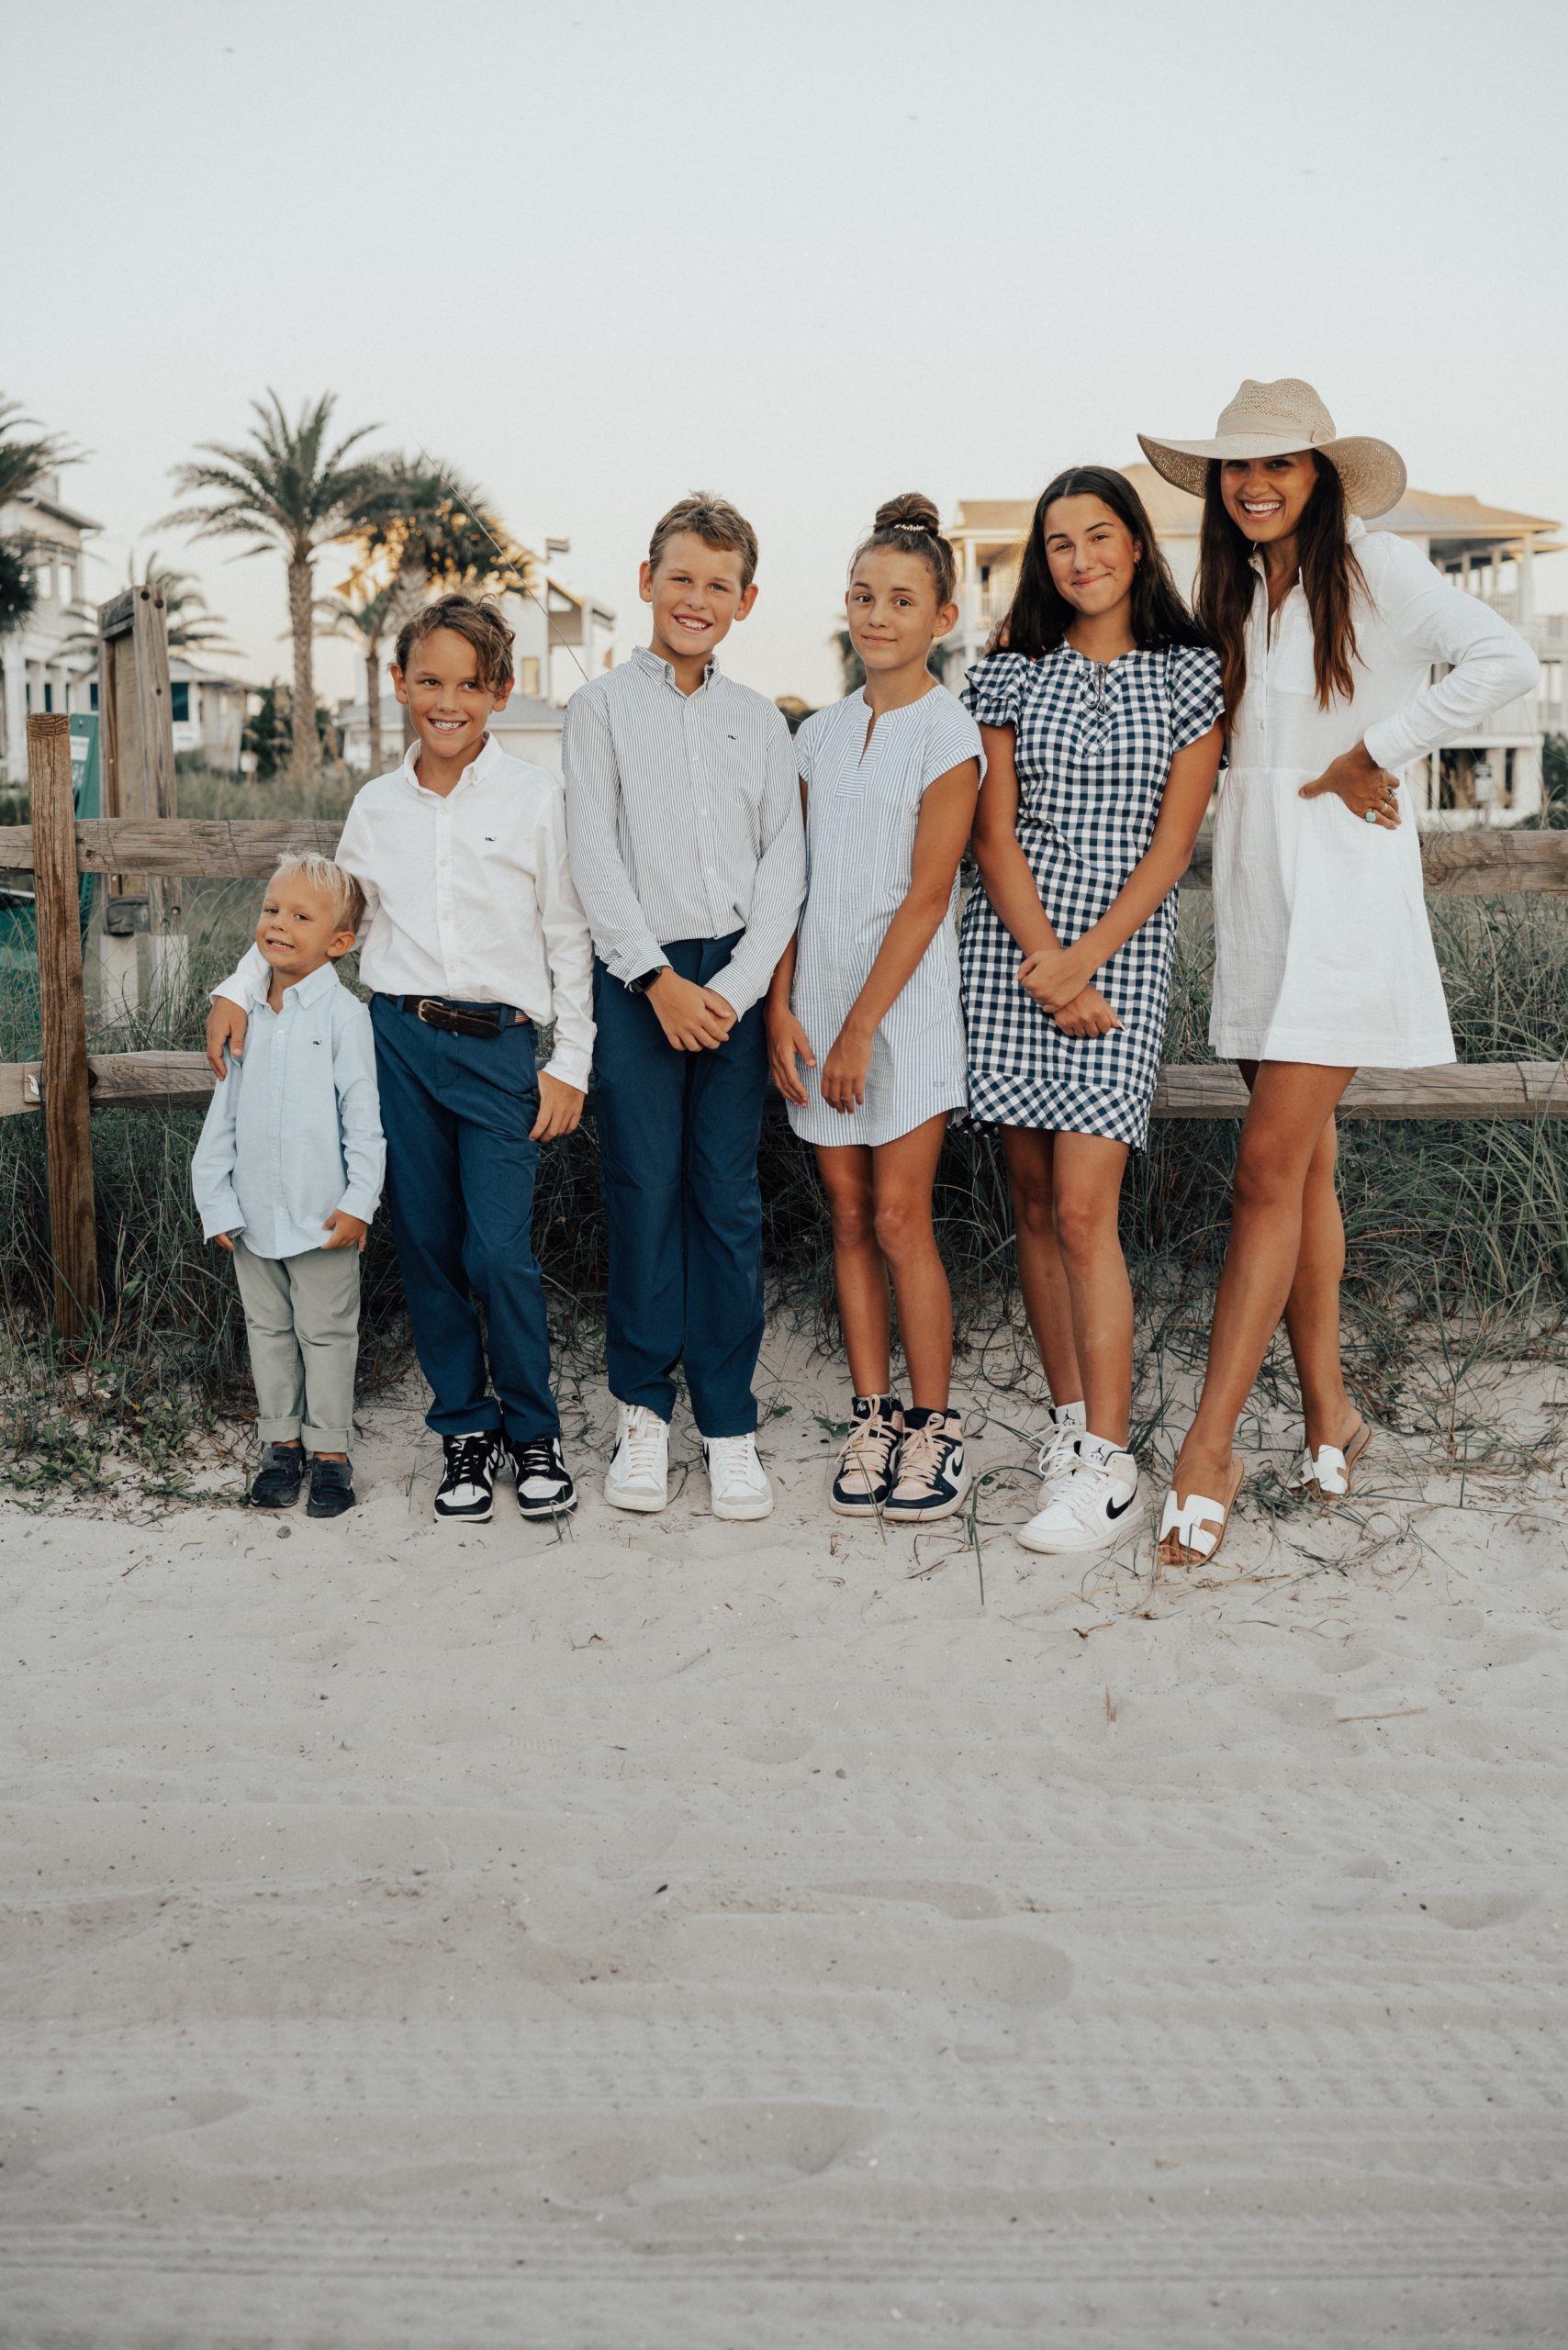
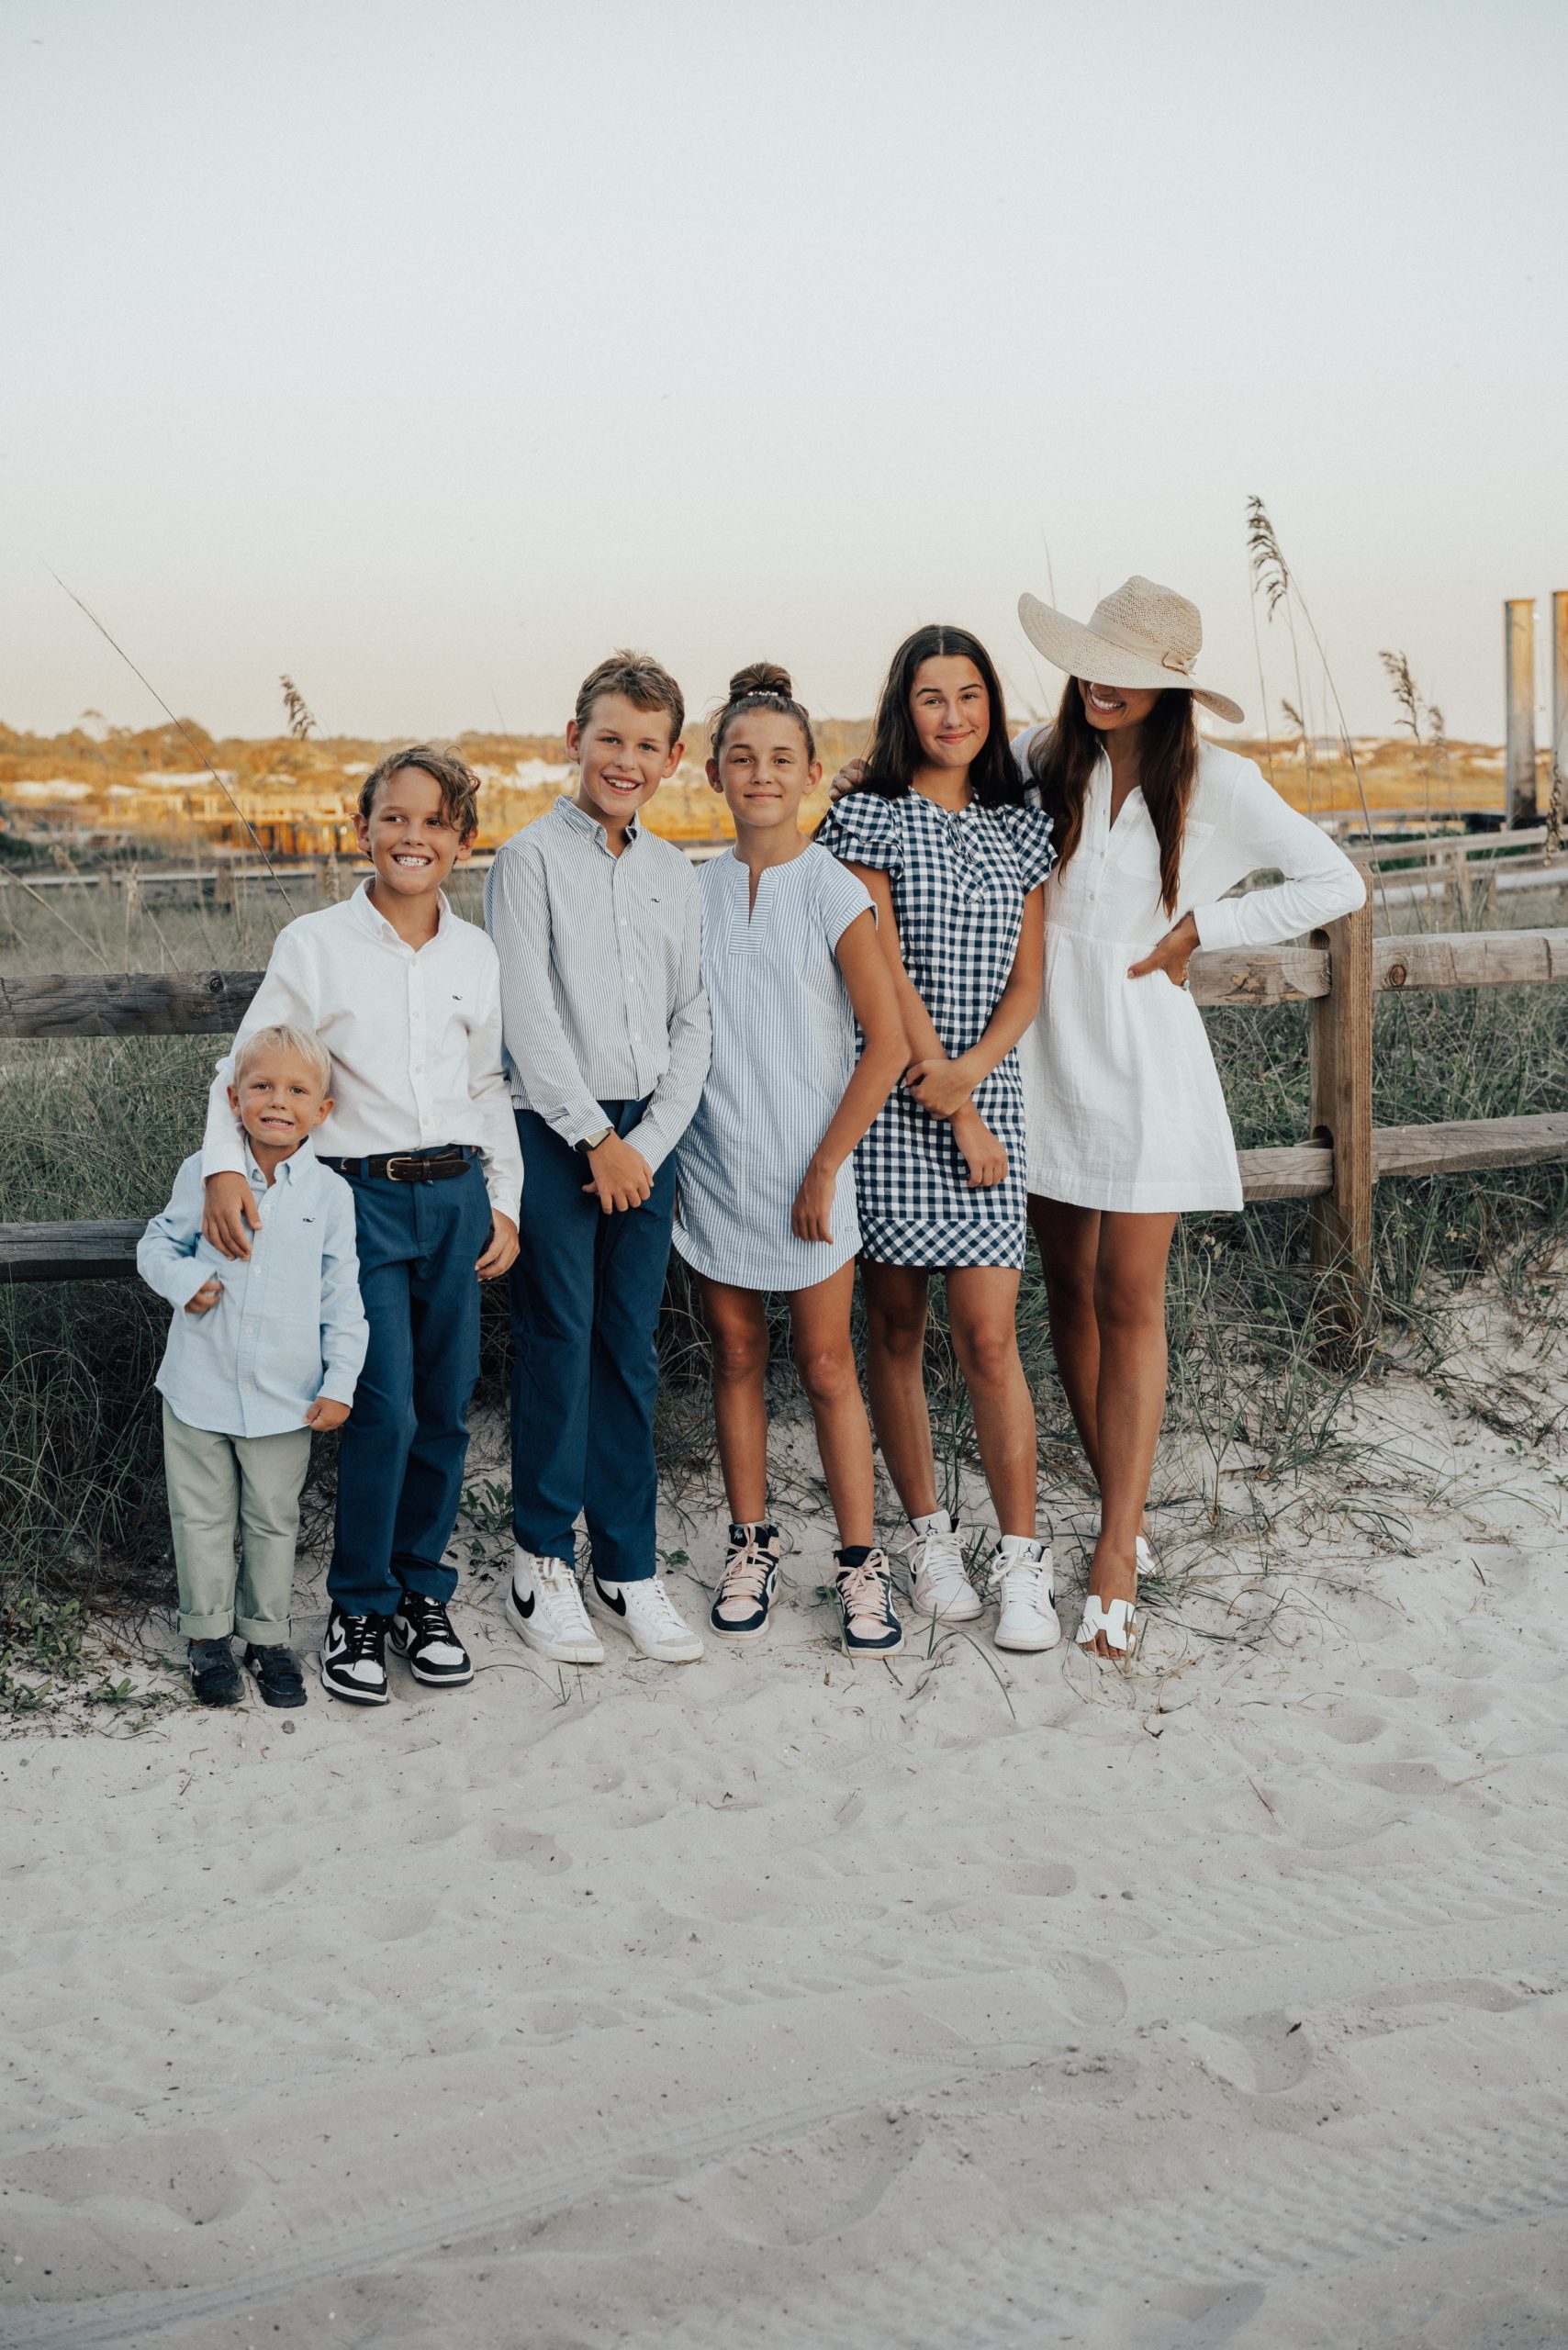
It’s beginning to look a lot like Christmas card season all around the beach.  The families are dressed in their perfectly matching shades of white.  It’s a hustle to get those Christmas card pictures just right, so I recommend getting started now.  The weather is still warm, the kids are happy, and you will be the first card in everyone’s mailboxes for sure like that superstar mom you prove to be daily.  Just kidding.

But in all seriousness, here are my Christmas card strategies to help you enjoy some calm in the crazy.

First, save money and don’t use hire out photography.  We purchased a tripod and use the self-timer function on the camera.  It reduces a lot of stress hiring someone and then you can work with your own schedule.

We timed our photo just before sunset and was fortunate to have amazing light.  Make sure to face the sunset when taking your picture just at the right time.  Right after sunset is perfect even light and then the kids won’t be squinting.  We then use Light Room to filter the image and brighten it up if needed.

Secondly, we order our cards through Minted. They can easily be personalized, are quality and I like their designs.

Thirdly, match your outfits however you like.  Our family has been loving Vineyard Vines lately, so we all wore our favorite Vineyard Vines outfits.  The colors all coordinate nicely.  We let the kids pick out what they wanted, and a touch of gingham really adds to the style of the scene. What do you think? Don’t sit on this idea, schedule your family photo this weekend, order your cards and give yourself a big pat on the back. Now, only if ordering the bay leaf wreathes, my dad’s gift, and decorating was this easy.

Maybe next year.

Click to shop our outfits below:

Boys Bleeker pants // Boys White Oxford shirt // Boys Stripe Shirt // Toddler Canvas Pants // Toddler Oxford Shirt

Shalice’s White Dress sz 4 // Shalice’s Stripe button down in Medium // Reid’s canvas pants in gray // Reid’s gingham shirt // Straw hat // “H” Sandals

Girls Stripe Tunic Dress (she wore medium age 12) // Girls teen gingham dress (age 14, xxs)

I bought the new toiletry 26 bag from Fashionphile and I really wanted it to be a bag. I am both of these:

  1. A Klutz and I spill. (I needed an insert organizer that protects the bag from blush and pen marks)
  2. TBH I wasn’t using the toiletry bag as a toiletry bag

I bought the Louis Vuitton Toiletry 26 bag here

I bought the felt organizer insert from here

I bought the chain here (it hasn’t arrived in time for this post)

LV bandouliere strap here

Boyfriend tee I’m wearing here

Jeans in size 26

DIY custom framed art

by Shalice Noel

I was getting tired of the inflated shipping and delays, but wanted some killer framed art for the kitchen.

The last time we were in FL, Reid took some beautiful pictures in Alys Beach. Can you tell that’s our happy place? More of our FL house and 10 things to do in Destin HERE.

Ok, so how did you create this custom look, you ask, for roughly $80 each? Notably, it is nearly half of what I would spend otherwise. Keep reading.

1.First, I ordered 2 8×10 images that Reid took, in matte on Walmart.com and had them shipped.

2. Next I ordered a 24×24 frame from Amazon. Unfortunately, I noticed its not available right now, so I linked similar

3. I needed a 24×24″ matte with a 8×10 opening so I found one on Etsy, you can customize your opening. I chose 8×10. $30 each wasn’t bad! I love a rectangle within a square.

I love the look and this was a super fun project, though I hurt my hands a little doing it.

What do you think?

How to German Shmear

by Shalice Noel

Large basket // Floor Pouf // Two-toned basket // Shag rug // Gold Mirror // Similar Cactus // Faux fiddle leaf fig

German Shmear

Our basement room has a beautiful view of the mountains, but the space needed some love.  First up, our plans were to refresh the dark and drab stone fireplace.  Reid was hesitant covering up the natural stone at first but after cleaning the surface we noticed the previous owners must have altered the stone somehow.  

So with that, we took the German Shmear plunge.  I’ll admit You Tube and Pinterest helped A LOT in convincing us to take the dive. Yes, everyone is doing this right now and I still worry 20 years from now we will look back and say, ”why did we do this”? 

Without risk, you will have no reward and frankly, design is a risk.  So take the risk, my friends.

Here is a quick shopping list and step by step German Shmear process.

Shopping List

o   Mortar (Tile Grout) – We used white.  (White is typical for German Shmear)

o   Mixing Bucket

o   Mixing Stick or Drill Bit

o   Big Sponges

o   Cheap Paint Brushes (They will get destroyed)

o   Rubber Gloves (This is very messy)

o   Painters Tape

o   Trowel and or Spackle

o Putty knife

o   Ziploc Bags

Process

1.      Wash surface with water, bristle brush and sponge.

2.      Protect surrounding area with painter’s tape.  We used flatten cardboard boxes to lay around the hearth for protect.

3.      Mix mortar per package direction.  Mix to a consistency of thick frosting.

4.      Use brush to spread mortar onto surface.  Brushes work well for smooth surfaces.  But honestly your hands work the best.  So don’t be afraid to just dig in and shmear.  We put Ziploc bags on our hands and literally grabbed the mortar and slapped it onto surface.  Fill grout marks so that the mortar is flush with the stone/brick surface.  A trowel and spackle tool can also be used.  Beware, this is messy.  But we are washable.  (The mortar also is water soluble and does clean up with a wet rag pretty easily, just in case)

5.      Let mortar dry per package directions

6.      Just before mortar is complete dry.  Take wet sponge and brush entire surface till smooth, to your liking.  This is where the artist comes out.  Some like it rough and some like it smoother.  Go ahead and express yourself.  Exactly like styling an outfit.

7.      Remove the protective barriers and Viola!  A masterpiece.

Great job!  You are now a pro!

Tag me in your DIY photos.  I would love to see how your spaces turn out.

How to Spin Art

by Shalice Noel

OLYMPUS DIGITAL CAMERA

1. The directions on the Spin Art box are actually pretty good. So follow the directions and secure the square paper into the machine, turn it on and squeeze drops of paint while its spinning. You can adjust where and how much, but the rule of thumb is too much paint is usually too much paint.

OLYMPUS DIGITAL CAMERA

2. Take it out. Let the squares dry.

OLYMPUS DIGITAL CAMERA

OLYMPUS DIGITAL CAMERA

OLYMPUS DIGITAL CAMERA

OLYMPUS DIGITAL CAMERA

3. Admire it and be impressed. Bravo!

OLYMPUS DIGITAL CAMERA

OLYMPUS DIGITAL CAMERA

They loved this so much! I told them to choose 2 colors and up to three squirts of paint. We took turns (for the most part) and they loved the result.

OLYMPUS DIGITAL CAMERA

OLYMPUS DIGITAL CAMERA

4. If you want to make your spin art square into art for your living room like I did above, just take it to your nearest printer. I took it to a Fedex Kinkos and requested it blown up to 21.5″ x 27.5″. He had to change the color from reddish pink to orange, which still looked great, and then I purchased a frame from Michaels – for reference, my frame is 25.5″ X 31.5″ . It wasn’t super expensive but I’m in the stage of life where everything eventually gets chipped or beaten up, so I’m okay with a cheap frame should a baseball fly through the house. You should have seen their faces when they first saw their spin art framed on the mantel. Reid and I believe art should be kid-friendly, accessible, and something that they are a part of in the home – and not just for art museums. p.s. If you try this at home, let me know what you did and how you did it!